Saturday, March 31, 2018

Best Wishes!

Hello friends, welcome to another post where I am playing with some Craftslane lazer chips, handmade foam flowers and some filler flowers.


And here's a pictorial tutorial for you all how I have assembled the card.


For all the supplies please visit :

https://www.craftslane.com/

Until then, Happy Crafting!


Wednesday, March 28, 2018

Lets Celebrate!

Hello Friends, welcome to another project of mine where I have used the newly released peonies in a very different way. Yes its not shaped flowers or glitters but simple coloring. Actually when I received this collection in my hand I was tempted to start coloring seeing the beautiful images of the peonies.


Instructions

The final card measures 5.5” x 4.2” and in created with some water coloring and layering to raise the colored peonies. The card is pretty simple however the coloring of the peonies will take some attention and time as the sketch is very accurate and details. The more the shades the better will be the folds of the flower petals. First stamp the small and large peonies on a white card stock using black archival ink. First apply a very light coat of the Plum archival ink on the edges and the center of the petals. Later using zig brushes and Raspberry pink start shading every petal. This way complete all the flowers and leaves.To create the background stamp some peonies images at random corners using Shadow Grey archival Ink. Cut and score a grey card stock at 4.25”x5.5” to form the card base. The stamped white card stock measure 1/8” less than the card base. Using a foam adhesive adhere the top layer to the card base. Once the card panel is ready layer the colored peonies and then on top attach the sentiment. All the layers are raised using chipboard pieces.

Products

HCD1-7173 Small Sweet Peony Die
HCD1-7174 Large Sweet Peony Die
HCPC-3819 Small Sweet Peony Cling Stamp Set
HCPC-3820 Large Sweet Peony Cling Stamp Set
159723, Designer Dries clear Adhesive
352854, Glue Tips - Metal
HCCC2-451, 8.5 x 11 Cardstock - White

Love
Piyanki

Sunday, March 25, 2018

Inspire!

Welcome friends to another beautiful Sunday where I am playing with some spring colors , canvas and brushes. 2018 is a year to experiment, learn new art form and definitely be out of your comform zone. With that thought in mind I created a mixed media canvas inspired by many elements and moodboard.

Primarily the moodboard Mystic at Mixed Media and art inspired me to conceptualize the canvas. Various elements , color and the concept has been incorporated in my canvas.

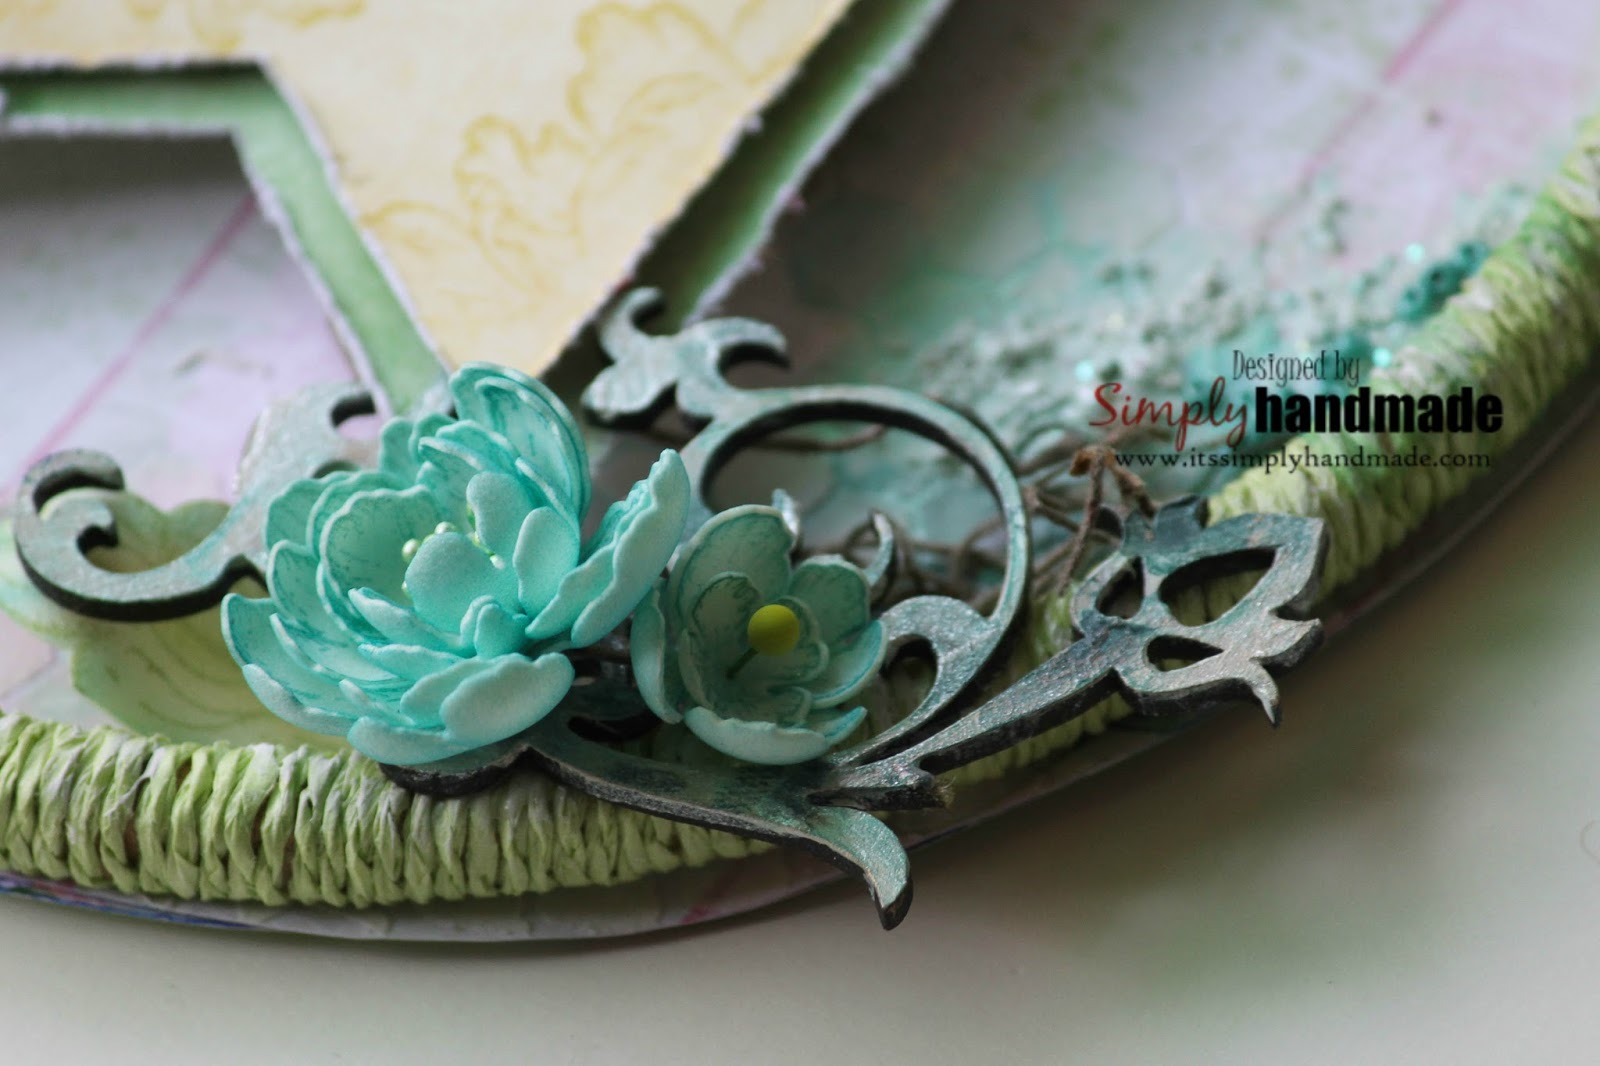
I picked up the main colors which is shades of green , brown and black.The sketch shape round at one far end inspired me to create the shape of my focal point. For the texture I added moss , leafy woody brances ( These are real ones picked up from the road, washed , dried and then gessoed). The creeper plants in the image also helped me add the branches and leaves.


The word Trilogy inspired me in a fun way I must say. All the trilogy movies have always shown how time has travelled , sitiation has changed and new characters have evolved.I have used a clock stencil to create my background depicting the number III and also a wooden clock chipboard which is added as an element to represent time.


The moodboard has inspired me to collect all my elements , colors that I would use for my project hence the canvas says " Inspire"


I am entering this canvas in the below challenge:

Mystic - Mixed Media and Art

Until then, have fun carfting!

Wednesday, March 21, 2018

Your Gorgeous!

Hello Friends, welcome back to another Wednesday where we are playing with the newly launch peonies. Its such a versatile collection that you can create  your own color flowers. Today I have a card with a dry embossed technique using the die cut and then adhering it to the center piece of the card.Lets have some close looks at the project.


Instructions

The final card measures 6.5” x 4” created with fresh handmade peonies and partial die cutting and embossing technique. Start by taking a blue card stock and cut and score it to measure at 6.5”x4”.For the second layer take a white card stock at 1/8” less than the card base. For the third layer take a pattern paper from the Peony collection and then cut it at 1/8” less than the second layer. Distress all the edges for all the layers. For the front layer lay the decorative medallion die and then run it through the big shot with an embossing mat so that the die doesn’t cut through. Later I die cut another piece of the same die and then placed it on the embossed layer so that it is raised with a color offset.For the flowers stamp several pieces of the small and large peonies on a white card stock using the cobalt archival ink. Using the distress broken china ink color the petals. Die cut all the pieces using co rodinating die. Wet them with little water and then shape the petals. Heat set once all flowers are shaped. For the leaves stamp the leaves using library green on a white card stock and then color them using leaf green archival ink. Die cut all the pieces using the co rodinating die and then shape them and heat set all the leaves. For the filler leaves and flowers stamp the leaves from the simply classic stamp collection using black archival ink and then die cut all the pieces. Color the leaves using zig brushes. For the peonies stamp the large peony on a vellum sheet using embossing ink and then heat set with white embossing powder. Once set die cut using the co rodinating dies and glitter the flowers and leaves using the crystal clear.To assemble the card, create a bouquet at the top corner of the card using the hand shaped flowers, leaves on a backdrop of vellum flat peonies. Tuck in some small filler flowers and also a small carnation to balance the color palette. Place the filler leaves in appropriate places. On diagonal end place another bunch of flowers and leave and place the sentiment one a half cut decorative die cut border from white card stock.

Products

HCD1-7173 Small Sweet Peony Die
HCD1-7174 Large Sweet Peony Die
HCPC-3819 Small Sweet Peony Cling Stamp Set
HCPC-3820 Large Sweet Peony Cling Stamp Set
HCDP1-288 Sweet Peony Paper Collection
159723, Designer Dries clear Adhesive
352854, Glue Tips - Metal
HCCC2-451, 8.5 x 11 Cardstock - White
Love
Piyanki


Thursday, March 15, 2018

Happy Easter + New Begining

Hello Friends I have a very exciting news to share with you all , some new products to work with and ofcourse new projects.

Today I start the journey as Creative Partner with Craftslane. Known to many Craftslane is a large one stop shop for all MDF products. Their products are smart , stylish and definitely has an edge over others.I would be collaborating with them on their paper products as they have a huge collection of decoupage papers , pattern papers , inks , embellishments , fabric flowers and so many more.

You can check out the entire range HERE.

Now to my project I have used their pattern paper , some fabric flowers and an easter egg for my card today. I have a picture tutorial for you all to refer and also feel free to reach out to me for any details.


Product Used
LAce Flowers
Tacky Glue
White Card Stock
Trims and Lace
Glitters and Art Stone
Gesso
Soft Gel
Filler Flowers

Wednesday, March 14, 2018

Altered Hoop+Debuting Peonies

Welcome Friends to a brand new collection from Heartfelt Collection. Its the second Wednesday where we launching the sweet Peonies collection. Its the flower that comes back every spring with its vibrant colors. This collection gives you all the images large images to color and shade , large and small petals to shade and shape to form your own flowers.Its one of the classic flowers thats a must in your garden and craft room too.

Today I chose to alter a embroidery hoop. I have kept the color to one tone and used foam flowers for the decor.


Instructions

It’s a medium size embroidery hoop that has been altered. To create the base cover the entire hoop using baker’s twine using some tacky glue. Take any pattern paper from the paper collection and prep the base by applying some gesso. Take a stencil and then apply some texture paste at random corners. Sprinkle water base spray paint, art stones, and some crystal clear. Heat set at every layer before applying the next. Once all layers are dried add some beads and art stones. Once the base is ready stick the paper to the base of the hoop which will form the surface on which we can start layering the projects.Cut two fish tail banners measuring at 3”x1.5” and another at 1/8” less than the base one. Distress the edges and on the front pattern banners stamps some images of the peonies with mustard distress ink. On the front banner stamp the sentiment from the words of encouragement set using black archival ink. Place the banners on a foam adhesive and then place it on a foam adhesive at the center of the hoop.To create the flowers, stamp and die cut several pieces of the small and large peonies from the art foam and then shape them by pressing against any heat tool. Pierce a hole at the center and then place the flower stamens and set it using any tacky glue. For the leaves using leaf green archival ink and then shape the leaves also similar way. Once all flowers and leaves are made start assembling them around the banners and also create the base using some dry ferns, lace and also some wooden chippies colored and embossed. Once all assembled add some glitter and some more glitter spray paint at the end.\

Products

HCD1-7173 Small Sweet Peony Die
HCD1-7174 Large Sweet Peony Die
HCPC-3819 Small Sweet Peony Cling Stamp Set
HCPC-3820 Large Sweet Peony Cling Stamp Set
HCDP1-288 Sweet Peony Paper Collection
159723, Designer Dries clear Adhesive
352854, Glue Tips - Metal
HCCC2-451, 8.5 x 11 Cardstock - White
HCDA1-450Stack and Store Daubers- Pack of 6


Sunday, March 11, 2018

Believe!

Hello Friends, welcome to yet another brand new post and this time I am playing with some colors and textures. We are welcoming Spring in my part of the world and its beautiful. Todays's project is very special to me as the elements that I use in my project today is what I collected from the sea side.

Last Year I visited Goa, from where I picked up various shells and snails. Cleaned and washed them and have been hoarding all this while. I picked up few of the shells to create a mixed media desk wall art.

I have used a acrylic stand which was lying in my house for long so thought of altering it. Theme I choose beach, sea side and some positive thought. I created this  keeping in my mind More Than Words Challenge where the colors and the word inspired me.

I used the Turquoise aqua and teal shades from the color comb and the word Believe is what comfort me most. My Believe is my strength and what makes me most comfortable. Also sea side , beach is something I am most comforble with for any vacation. So I chose the word.


Entering in : March 2018 Main Challenge

Wednesday, March 7, 2018

Thinking of You with Enchanted Mum

Hi Friends , welcome all to another fun filled Wednesday! We have a series of inspiration for you all today from Heartfelt Creations. My project for today features the enchanted Mum flowers, some lace die cut hearts and layering.

Here's how my card looks with some close up of the pictures.


Instructions

The final card measures 5.5” x 4.25”. To create this card cut a white card stock to measure the final card base at 5.5” x 4.25”. Take a pattern paper that measures 5.4”” x 4.1” and distress the edges Take another pattern paper with 1/8” less and distress the edges too. Cut two pieces of white card stock measuring 1.5” x4” and then slit at the middle to form a fish tail banner. Similarly cut 2 pattern paper measuring 1/8” less than the card stock and distress the edges. Adhere all the banners on a 45 degree alignment on a foam adhesive so that it’s raised. Die cut 3 piece of the eyelet heart pieces from the decorative pattern paper and on the top layer stamp the sentiment Thinking of you using black archival ink. This creates the front panel of the card.For the flowers stamp and die cut several pieces of the enchanted Mum collection from a white card stock and plum archival ink. This time instead of spraying with water I have sprayed with some spray alcohol ink which stained the flowers yellow. Later heat dry them after shaping. Once the flowers are dried added more shades of dried marigold and picked raspberry. Heat set them again and at the end dabbed some glossy accents on the petals tip and sprinkle some crystal clear. For the leaves it is shaded using library green and leaf green archival ink and also sprinkled with crystal clear and heat set it after shaping the leaf ends.To finish the card start assembling all the flowers and leaves to make a cluster around the banners and the hearts. Add a metal key embellishment on the front heart to add the final touch to your card.

Products


Love Always
Piyanki