Friday, September 28, 2018

Money Envelope

Welcome to the Heartfelt May Alumni Blog hope where we celebrating creativity along with all the beautiful crafters.

The winner will be announced on the HC blog and on Facebook on May 30th.Please leave comment on all the participating and stand a chance to be the winner. The winner will be announced on the HC blog and Facebook page. Be sure to email to heartfelt Creation at with the subject line as " Winner of the May Alumni Hop" 

Email ID :  socialmedia@heartfeltcreations.us


Creating with Heartfelt is fun , interesting and a super creative journey. Its been a while I have blogged and so thought our monthly blog would be the best one to get back with.

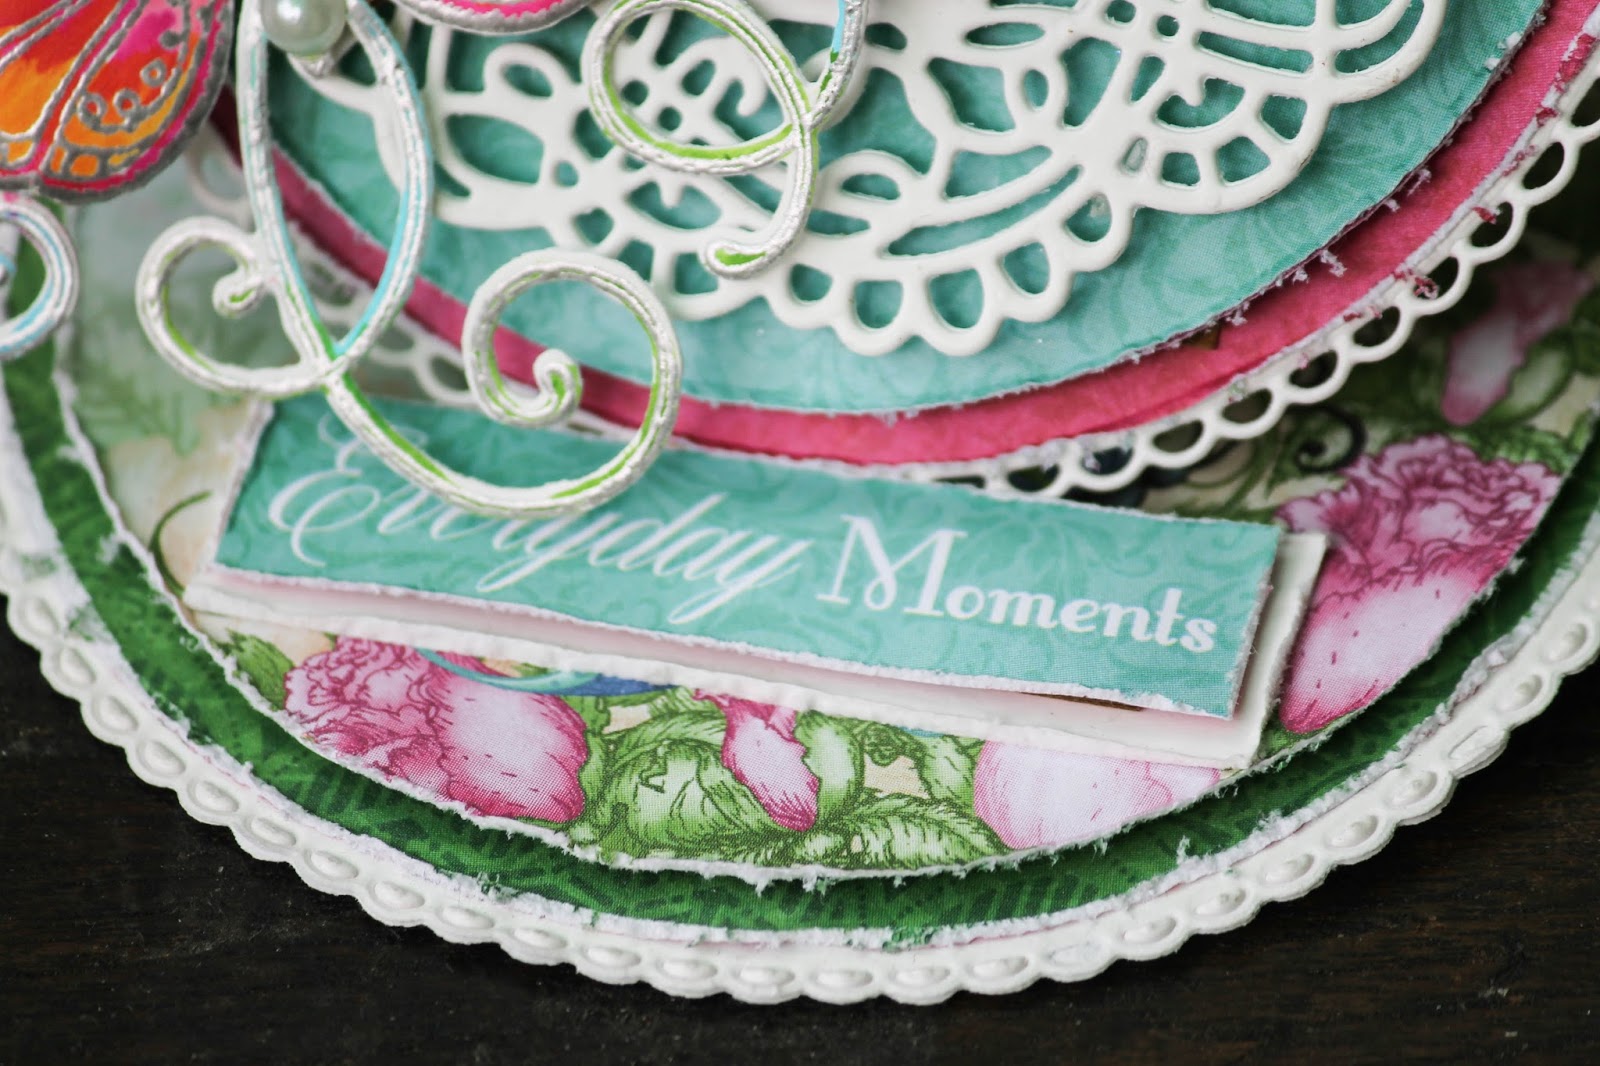
Today I have a beautiful money envelope I created using loads of heartfelt dies and papers. It has a ribbon tied opening with 3 folds. Below is a close up pic that I have for you all.
Creating this has been very simple however shaping the flowers , coloring the leaves has been so liberating.


Do share how you liked it and also the arrangement. I have loads of projects lined up for the upcoming month to share with you all!

From here you will hop onto the beautiful and creative
Archana


Happy Crafting , until next time!


Friday, May 25, 2018

A beautiful Change!

Hello Everyone, today I have a very beautiful project to share with you all! Its quite summery , bright and shiny on my part of the world. This project is inspired by where I live , mood boards and definitely the fun of working with colors and chips.

The moodboard of Dusty Attic inspired me a lot not only with the bright yellow and orange but also with the theme. I am working with lot of chips featuring in my projects and also in my altered Canvas I preferred to pick up a quote as a focal point than an image or a photograph.

So here's some close ups and the project I created.Every element in my project has a story to attach to the layout.


Here I am using a Dusty Attic chipboard inspired by the wedding bouquet and the tale center piece. I gessoed it and then painted it green with some splashes of stones.

   
    I love flowers and love to make handmade ones, so the orange and yellow color palate in the moodboard is from where I picked up the colors also flowers form part of the storyboard. The chipboards are colored with golden and silver sparkles depicting the bride shoe in the picture.


    Creation of a butterfly is a new life , a new beginning and so is the wedding . I loved the quote as it adds a lot of depth.

       
    Here's the final canvas which shows the entire layout with all the elements,.


I am entering this in the dusty Attic Blog. Below is where you will find all the elements I used from


Hope you liked it and do share your love and comment.

Until then Happy Crafting!

Alumni May 2018 Blog Hop by Heartfelt Creations


Welcome to the Heartfelt May Alumni Blog hope where we celebrating creativity along with all the beautiful crafters.

The winner will be announced on the HC blog and on Facebook on May 30th.Please leave comment on all the participating and stand a chance to be the winner. The winner will be announced on the HC blog and Facebook page. Be sure to email to heartfelt Creation at with the subject line as " Winner of the May Alumni Hop" 

Email ID :  socialmedia@heartfeltcreations.us


Now lets look at the Gorgeous flowers , some beautiful tags using the newly released border dies.


   I have used the flower dies and co ordinating stamp that is available in the website now along with their co ordinating paper collection.

Let me know how you like and thanks for Stopping by! Be sure to stop by at all the blogs to win.


Friday, May 18, 2018

Memories.. are FOREVER!

Hello Friends, its been a while I have blogged my creative journey and new inspiration with you all! However various challenges around the world tickled me to get into my creative juices.

Today I have a mixed media Canvas for you all inspired by 2 mixed media challenges and also introducing the Craftslane newly launched chips. You can see all the beautiful wooden chips here at the link Craftslane.

Now onto the project, I love keeping 2-3 colors on my canvas while leaving a lot of the white space allowing it to draw most of the focus on the element. Also I prefer to use words and phrases instead of photographs.


I chose the Frame and Memory as a inspiration from the More Than words challenge and the color palette from Mixed Media Art Challenge. Create mixed media textured background on which assembled on the various elements , chips , Prima flowers around a decorate Prima Frame.


Choose a Resin Frame around which all  the elements are assembled and also the word Forever. Memories are for forever hence Forever signifies Memory for me.


The color palette , flower and the butterfly resonates in my mixed media canvas.

Let me know how you liked my projects,
Until then Happy Crafting!


Entering in:

Mixed Media and Art - May Challenge
Morethanwords - May Challenge Frames and Memory
Mixed Media Warriors


Wednesday, April 25, 2018

Debuting Frame a Card Dies

Welcome friends to a mini launch by Heartfelt Creations and its fabulous. The dies include some excellent frames , intricate borders to add the magic and elegant touch to your cards.

The entire team has many inspirations to share with you and here's what I have for you.


Instructions
The final card measures 7"x 5" and is built on a white card base. The card has 4 layers and the top most layer has the filigree layout created. Cut a navy blue card stock which measures 1/8"less than the white card base. Cut another gold card stock that measures 1/8" less than the navy blue card stock. Take another white card stock and die cut the leafy borders and from a gold card stock die cut the solid border die from the Leafy border die set. Glue all the white leafy border onto the gold card stock die cut borders. In order to fill the sides and the grooves, die cut several pieces of the decorative die from the window box elements die. Strip them from the corners and middle and tuck it in alignment with the gold panel.
For the flowers, Stamp the flowering dogwood flowers and leaves from the window box elements die set on a white card stock using embossing ink. Sprinkle some gold embossing powder and then heat set it. Die cut all the flowers and leaves using the coordinating die. Apply a very light shade of the archival ink (Vibrant Fuschia) to the flowers and Library Green to the leaves. Sprinkle some water to the die cut flowers and leaves and then shape them. Heat set them so that the flowers retain the shape.
For the center focal frame die cut 3 piece of eyelet frame die from gold card stock and adhere to each other to create a sturdy frame. Stamp the sentiment with black archival ink on a white card stock and with a foam adhesive adhere it to the center of the card layout. Arrange all the shaped flowers and leaves around one corner of the center gold frame. Add a string and some pearls to finish the card.
Supplies

Wednesday, April 18, 2018

Thankful Easel Card with fresh Butterfly collection

Hello Friends, welcome to another Wednesday Inspiration where we are creating our projects with newly released butterfly collection. I have made a easel card for you all using some basic shape cards, enchanted Mum and also some colorful butterflies.


.


Instructions

It’s a small cute round easel card created with the decorative dies, enchanted Mum flowers and fluttering butterfly. Die cut 2 decorative round pieces from a white card using the  Eyelet Circle & Basics Small Die. Take a smaller circle size and die cut 2 pieces from the butterfly pattern paper collection. Distress the edges and then stick it to the base. For the easel, score at the middle and then fold the circle into half which will form the easel base. For the pattern paper cut it into half, distress the edge and then stick it to the easel base. For the Easel card take a further smaller die from the circle basic small die and die cut a pattern paper. For the next layer die cut a piece from the butterfly decorative circle die using a white card stock and then stick it to the middle of the pattern paper. Take the smallest circle die and die cut it from a black card stock. Die cut the word Thank you from silver card stock and stick it to the center. As a decorative insert die cut a piece from the circle decorate die from the Butterfly collection and then tuck it in at the top.For the flowers stamp and die cut several pieces of the enchanted Mum collection from a white card stock and plum archival ink. This time instead of spraying with water I have sprayed with some spray alcohol ink which stained the flowers yellow. Later heat dry them after shaping. Once the flowers are dried added more shades of dried marigold and picked raspberry. Heat set them again and at the end dabbed some glossy accents on the petals tip and sprinkle some crystal clear. For the leaves it is shaded using library green and leaf green archival ink and also sprinkled with crystal clear and heat set it after shaping the leaf ends.Stamp the butterfly image onto a white card stock using embossing ink and heat emboss with silver embossing powder and heat set it. Color the stamp and embossed image with zig brushes and then die cut using the co rodinating die.

Supplies

HCD1-7178 Fluttering Butterfly Die
HCDP1-289 Butterfly Dreams Paper Collection
HCPC-3825 Butterfly Kisses Cling Stamp Set
HCD1-7179 Butterfly Kisses Decorative Die
159723, Designer Dries clear Adhesive
RACP499 Ranger Archival Ink Pad – Black          
352854, Glue Tips - Metal
HCCC2-451, 8.5 x 11 Cardstock – White


Wednesday, April 11, 2018

Debuting Fluttering Butterfly Collection+Magnetic Calendar

Hello Friends, welcome to a inspirational Wednesday where we are debuting the Fluttering Butterfly collection.


Instructions


It’s a magnetic calendar built on a white chipboard and embellished with foam flowers and a white fluttering butterfly. Take a piece of white chipboard that measures 7”x3”. Cut a pieces of pattern paper from the paper collection and cover the chipboard. Take another pattern paper that measures 1/8” less than the chipboard and then stick it .Stick another layer of pattern paper that measures 1/8” less than the first layer. Distress the edges of all the paper. Die cut a butterfly using a white card stock, cut 2 piece and adhere to each other to make it sturdier. Stick some pearls to finish the butterfly.For the flowers, used some foam. Stamp and die cut some foam flowers from the botanical collection using Plum Archival ink and teal Archival ink. Once die cut apply heat to shape the petals and the leaves. Once all the flowers are shaped place them into a bunch of pearl stamens. For the calendars, print any style and then cut it into 3”x2”, punch them and tie it with a jute twine. Assemble the flowers, die cut butterfly and the leaves. Place a pair of magnet and then place the calendar.


Supplies

HCD1-7178 Fluttering Butterfly Die                                                                                                
HCDP1-289 Butterfly Dreams Paper Collection
159723, Designer Dries clear Adhesive
352854, Glue Tips - Metal
HCCC2-451, 8.5 x 11 Cardstock - White

Friday, April 6, 2018

Smile!

Hello friends, welcome to another post of mine where I am breaking some of my comfort zone , playing with some colors , wooden chips and foam flowers.

I am at Craftslane today with their amazing collection of Wooden bases , chips and some paints which has been newly introduced.

I have taken a wooden round placement mat and covered with white gesso. Later cover the base with some lace , corrugated sheet ,  and also stencil the background. Once all covered apply another quote of white gesso. Once all dried you can choose your paint and then start with the layers. For the flowers I have shaped them using a foam sheet and some stamens. The color palette I tried and kept it to Magenta , ruby and shades of pink. Used the Bird cage as the focal for the layout.After applying a coat of white gesso painted the cage white and also added the small birdie.


Hope you like it. Thanks for stopping by!
Until then Happy Crafting!

Wednesday, April 4, 2018

Pretty Pink Basket

Good Morning Friends, Welcome to another fun inspirational Wednesday. I am at Heartfelt Creations today and having some creative time making a basket using some pattern papers , flowers shaping stamp , dies and molds.


Instructions

We all love pretty way of gifting our handcrafted goodness and love. Today the basket speaks of the same. Take any color card stock and cut it as 8 1/4”x6 3/4”. Score all sides at 2” and fold it. Take any pattern paper and cut it at 1/8” less for all the sides and adhere to it. Fold the box and adhere all the sides. For the handle cut a long strip of colored strip of paper that measures 1.5”x10”. Cut a piece of pattern paper which measures 1”x10” and stick to it. In order to decorate the handle die cut a piece of decorative border die  and stick to it. Once all done tuck in the handle on both the sides. To decorate the basket, die cut 2 piece of decorate die from a white card stock. I have placed the die cuts on both opposite ends of the basket. For the flowers.I have stamped various pieces of the flowering dogwood using plum Archival ink from a white card stock. Die cut and then color the die cuts using Pink and Green archival ink. Sprinkle some water and damp the flower die cut pieces. Shape them using the flower shaping tool and then end the flowers using the center prills. Assemble the flowers with some frills and leaves. For the frills and filler flowers I have used the lush Lilac flowers and also the filler image. Colored using the zig brushes.

Supplies

HCD1-7170 Lush Lilac Die
159723, Designer Dries clear Adhesive
352854, Glue Tips - Metal
HCCC2-451, 8.5 x 11 Cardstock - White

                          Until then Happy crafting and see you soon with some creative inspiration.


Saturday, March 31, 2018

Best Wishes!

Hello friends, welcome to another post where I am playing with some Craftslane lazer chips, handmade foam flowers and some filler flowers.


And here's a pictorial tutorial for you all how I have assembled the card.


For all the supplies please visit :

https://www.craftslane.com/

Until then, Happy Crafting!


Wednesday, March 28, 2018

Lets Celebrate!

Hello Friends, welcome to another project of mine where I have used the newly released peonies in a very different way. Yes its not shaped flowers or glitters but simple coloring. Actually when I received this collection in my hand I was tempted to start coloring seeing the beautiful images of the peonies.


Instructions

The final card measures 5.5” x 4.2” and in created with some water coloring and layering to raise the colored peonies. The card is pretty simple however the coloring of the peonies will take some attention and time as the sketch is very accurate and details. The more the shades the better will be the folds of the flower petals. First stamp the small and large peonies on a white card stock using black archival ink. First apply a very light coat of the Plum archival ink on the edges and the center of the petals. Later using zig brushes and Raspberry pink start shading every petal. This way complete all the flowers and leaves.To create the background stamp some peonies images at random corners using Shadow Grey archival Ink. Cut and score a grey card stock at 4.25”x5.5” to form the card base. The stamped white card stock measure 1/8” less than the card base. Using a foam adhesive adhere the top layer to the card base. Once the card panel is ready layer the colored peonies and then on top attach the sentiment. All the layers are raised using chipboard pieces.

Products

HCD1-7173 Small Sweet Peony Die
HCD1-7174 Large Sweet Peony Die
HCPC-3819 Small Sweet Peony Cling Stamp Set
HCPC-3820 Large Sweet Peony Cling Stamp Set
159723, Designer Dries clear Adhesive
352854, Glue Tips - Metal
HCCC2-451, 8.5 x 11 Cardstock - White

Love
Piyanki

Sunday, March 25, 2018

Inspire!

Welcome friends to another beautiful Sunday where I am playing with some spring colors , canvas and brushes. 2018 is a year to experiment, learn new art form and definitely be out of your comform zone. With that thought in mind I created a mixed media canvas inspired by many elements and moodboard.

Primarily the moodboard Mystic at Mixed Media and art inspired me to conceptualize the canvas. Various elements , color and the concept has been incorporated in my canvas.

I picked up the main colors which is shades of green , brown and black.The sketch shape round at one far end inspired me to create the shape of my focal point. For the texture I added moss , leafy woody brances ( These are real ones picked up from the road, washed , dried and then gessoed). The creeper plants in the image also helped me add the branches and leaves.


The word Trilogy inspired me in a fun way I must say. All the trilogy movies have always shown how time has travelled , sitiation has changed and new characters have evolved.I have used a clock stencil to create my background depicting the number III and also a wooden clock chipboard which is added as an element to represent time.


The moodboard has inspired me to collect all my elements , colors that I would use for my project hence the canvas says " Inspire"


I am entering this canvas in the below challenge:

Mystic - Mixed Media and Art

Until then, have fun carfting!