Wednesday, June 28, 2017

A Canvas with Dahlia

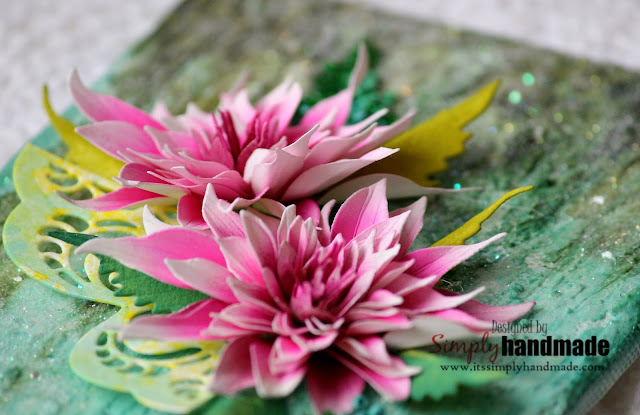
Welcome Friends to another post where I have the beautiful Dahlias on a Canvas from Susan's Garden. While I had fun creating this, also it reminds me of my childhood where I used to help and see my mother nurture these beauties.

Working with flowers makes you fall in love with the nature all the more and such has been my experience so far. This project is typically not a card but a textured canvas. Lets see some more close up and then how we can re create the same.


Intructions
  • Take a blank canvas and apply white gesso.
  • Take some texture paste and a knife and use the texture paste unevenly on the canvas without any stencils.
  • Take some spray paints and sprinkle on the textured surface after it dries completely.
  • Sprinkle some warm silk microfine glitter and sprinkle it after applying soft gel.
  • Die cut multiple pieces of Dahlia and shape them using the Metal tool and molding mat.
  • To assemble die cut a piece of romantic corner and tuck in before placing the flowers.
Products 
Canvas
Texture Paste
Sprays
Beads
Glue

Thats all I have for you all today. Do share how you like and leave your love and comments.
See you soon as the next blog!

For the Special Couple

The more I work on the Wedding Collection the more I get addicted to it. Looking at the possibilities, the endless options and ideas that this collection can trigger. 

Today I have a booklet which can be used a invite, a Photo Card or just a simple journalling booklet.

The collection has some intricate dies that is perfect for such an occasion.


Instructions

For the base use medium weight chipboard. The final project measures 4"x6". Cut chipboard and cover with the classic wedding coordinating paper from the paper collection. For the inside use co ordinating paper from the classic wedding collection and adhere the same. Use the HCD1-7144  Decorative Medallion Die and die cut several pieces from a white CS. Adhere all the pieces together and place it on one side of the booklet.This will serve as a pocket for the journalling or tags.On the other side keep the space for the photo.Use the Classic Rose Die to shape the flowers and leaves. Used the archival black ink to stamp and then shape the flowers and leaves using the Flower Shaping Essentials tools and distress ink for the coloring. The flowers and leaves are tied in a  bouquet with a net and some mesh for the cover. Used a Spellbinder die to create a shaker space for the sentiment and some glitter and sequence.Cover the back and rear panel of the booklet using the wedding paper collection. Arrange the shaker card, the flower bouquet and finish the project
using a ribbon for the closure.USed the HCD1-7144  Decorative Medallion Die to create the base on which the flower bouquet is placed.

Product Used

HCDP1-279  Classic Wedding Paper Collection
HCPC-3790  Classic Wedding Wishes Cling Stamp Set
HCD1-7110  Classic Rose Die
HCPC-3752  Classic Rose Cling Stamp Set
HCD1-7144  Decorative Medallion Die
HCPP3-452 Cardstock Pack of 25 - White
HCDA2-450 Stack and Store Daubers-Pack of 30
159723 Designer Dries Clear Adhesive
352854 Metal Tip for Adhesive Bottles

Do share how you like it and share your comments.

Will be back soon with more of my creations.

Saturday, June 24, 2017

Card with Alstroemeria

Welcome friends to another post where I have another flower from Susan's Garden. The more you make flowers more you fall in love with nature. These flowers are commonly called the Peruvian Lily. For the vase I have used the Victorian Cup with a little twist.

In India we have a folk art name Madhubani painting. It is done using very fine nib or brush pens. I have used the same folk art in the cup to create the vibrance and contrast to the bright orange Alstroemeria.


Also for the background I had fun adhering Congrats Die with white on white for the base. The card has 3 layers with the Altroemeria.

Do share how you like it and leave your lovely comments.

I will be back with some more fun projects so stay tuned.


Wednesday, June 21, 2017

Congratulations!

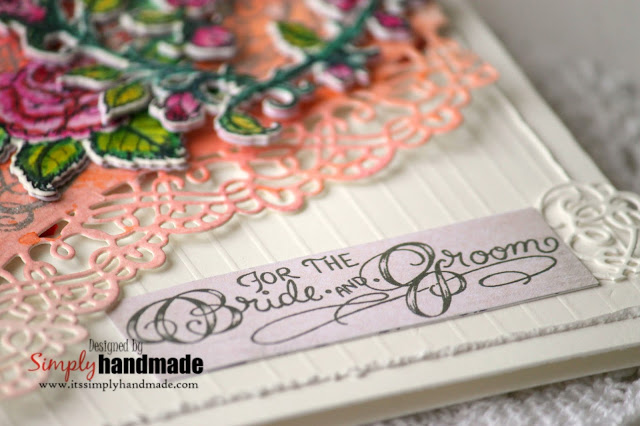
On a special day for a special couple and a handmade card could be the best combination that one can wish for. Today I have a card for you all which is simple, yet elegant, carries the wish for the Bride and the Groom!

Yes the recent debut collection from heartfelt Creation makes it possible.


Instructions

The Final card measures 5.5" x 7". It has 3 panels made of water color card stock and white card stock. Using the Classic Wedding Wishes Cling Stamp Set stamp the word Congratulations multiple time on a water color card stock with versafine embossing ink. Use Silver embossing powder to heat emboss.Post embossing sprinkle water along with distress ink and oxide to complete panel.
Use the Fleur Border Basics Die die cut the finished water color panel.Using the Classic Wedding Roses Cling Stamp Set stamp the heart image using archival black ink on a water color CS. Use distress ink water color the roses and the images.Make several such pieces to create a raised embellished piece. Using the Classic Wedding Roses Die die cut all the piece and adhere together.
Place both the die cut piece on the finished panel.For the second layer, score a white CS at 1/8" and adhere it to the Card base. Assemble all the panels along with the embellished Wedding Rose image. Finish the card by a fussy cut sentiment from the paper collection along with a piece from the decorative border die.

Products

HCDP1-279  Classic Wedding Paper Collection
HCPC-3790  Classic Wedding Wishes Cling Stamp Set
HCD1-7142  Classic Wedding Roses Die
HCD1-7120  Fleur Border Basics Die
HCPP3-452 Cardstock Pack of 25 - White
HCDA2-450 Stack and Store Daubers-Pack of 30
159723 Designer Dries Clear Adhesive
352854 Metal Tip for Adhesive Bottles

Please share what you like in this collection and would love to hear from you!

See you soon at the next blog!

XOXO


Saturday, June 17, 2017

Elizabeth Craft Designs + Sunflower Card

Welcome all. Today I am back with another card using one of the newly released dies from Susan's Garden. If you have not visited the garden yet then here is the link where you get to see all the new released dies.


Being one of my favourite flower I created a very simple card today with Sunflower being the focal for the card. Bright, Yellow and fresh from my craft Garden is what I have today for you all.


I would love to know what you think and also what you create with the sunflower die.

\Untill then happy crafting and see you soon at the next blog!

Wednesday, June 14, 2017

Debuting Classic Wedding Collection + Classic Wedding Tag

Its your Day and its the Wedding Day!

Today at Heartfelt we are debuting the Classic Wedding Collection. This day is full of memories, special moments, vows, wanting to look the best  and many more. From sweet and sentimental to funny and sad this day is full of emotions. There is excitement in the air and the hearts of many who have gathered to celebrate the special couple. Its the beginning of the journey which holds the hands of the two special person.

Such is the Classic Wedding Collection. It has the perfect sentiments, the grand decorative medallion and the wedding bells to complete the wedding bouquet for you. And not to forget the coordinated Paper collection which will add the extra touch to your wedding projects and gifts.

To debut the collection I have a Wedding Tag for all on a shabby Chic design. 


Instructions

Cut a chipboard piece to 3.5" x 6 ". Distress the sides and add white gesso. Cut a paper from the wedding collection paper stack at 1/8th inch less than the chipboard tag. Distress the edge , adhere white gesso to the sides. Cut 2 strips of paper from the paper stack to create the second layer.
For the wedding Bell. Stamp the wedding bell using black archival ink on a water color paper. Use the picked raspberry and ripe persimonn to color the bells. Use the coordinating die and die cut the wedding bell.Make some tiny filler flowers using the classic rose stamp and die. 
Die cut the decorative medallion 5-6 pieces from white card stock. Adhere them all together to create your own chipboard. Use a paper from the collection and die cut one piece from the medallion die and adhere on the top layer.For the composition on the chipboard base adhere all the ready pattern paper. Lay a piece of mesh and then adhere the medallion die and wedding bell on a dimensional foam to raise the effect.Cut a sentiment piece from paper collection and add it at the below. I have also used a cabochon to create an embellishment.

Product Used

HCPC-3789  Classic Wedding Bells Cling Stamp Set
HCD1-7143  Classic Wedding Bells Die
HCD1-7144  Decorative Medallion Die
HCDP1-279  Classic Wedding Paper Collection
HCD1-7110 Classic Rose Die
HCPC-3752 Classic Rose Cling Stamp Set
HCST1-401 Deluxe Flower Shaping Kit
HCPP3-452 Cardstock Pack of 25 - White
HCDA2-450 Stack and Store Daubers-Pack of 30
159723 Designer Dries Clear Adhesive
352854 Metal Tip for Adhesive Bottles

Other Products

White Gesso 
Texture Paste 
Chip Board 
Soft Matte Gel 
heat gun
twine
Ribbon 
Flower Beads 
Beads
 dimensional adhesive
 Glue Gun
 Glossy Accent
 Scissors
 heat tool
 Distress inks
Ripe persimonn
Picked rasberry 
Pine needle 
Vintage Photo
 Black Archival Black
Pine Needles

I would love to hear from you . Do share how you like it and share it with your friends and family.

Until then happy crafting and see you soon at the next blog!


Saturday, June 10, 2017

Self Challenge 2 + Mudra

Welcome back my lovely friends. Today my post on the self challenge that I have taken up for myself to create single or no layer cards.

So far its been fun and also a challenge I am loving to play. Last week is HERE which I made with the Mudra.

Today I picked up 2 more stamps from the Mudra collection and created 3 more cards. Lets have a look at all the cards.


Would love to know your comments and how you like the cards.

Will be back soon with some more of my creations. Stay tuned for upcoming weekly challenge.

Lots of love!


Wednesday, June 7, 2017

Petunia Pencil Holder

Welcome to heartfelt Wednesday! Today I have a altered project with the beautiful Petunia Flowers released this month.

I must say this flower is so versatile and so easy to form shape that you can use this to adorn any object or form of art.


Instructions

Cut strips of coordinating Paper from the Petunia paper stack.Use the paper stack to adhere to all sides of the pencil holder.Its altering a pencil holder so you can choose any design from the paper stack.

Stamp 2 set of petunias from Small and large Classic Petunia using archival ink and pine needle for the leaves. Using the coordinating dies, die cut all the stamped images.Use the Stack and store daubers to shade the flowers. Finish the flowers by stacking each other and lay it flat and add prills at the center.

Stamp and die cut the petunia classic bouquet using archival ink.COlor the images using water color and distress ink. Arrange the resin frame on one side of the canvas.Place the color petunia bouquet on one side of it using hot glue.Add prills, glitter, stamen as desired to complete the composition on the canvas panel.

Products Used

Chipboard Pencil Holder | Dimensional adhesive | Glue Gun | Glossy Accent | Scissors | heat tool, Distress inks | Barn Door | Vintage Photo | Archival Black | Pine Needles

HCD1-7141 Classic Petunia Bouquet Die
HCDP1-278 Classic Petunia Paper Collection
HCPC-3787 Classic Petunia CLing Stamp Set
HCD1-7139 - Small Classic Petunia Die
HCPC-3785 - Small Classic Petunia Cling Stamp Set
HCD1-Large Classic Petunia Die
HCPC-3786 Large Classic Petunia Cling Stamp Set
HCST1-401 Deluxe Flower Shaping Kit
HCDA2-450 Stack and Store Daubers-Pack of 30
159723 Designer Dries Clear Adhesive
352854 Metal Tip for Adhesive Bottles
ANC845 - Power Outage Prills
ANC824- Stop Whinning Prills

I appreciate you stopping by! Love to hear from you!
Untill then Happy Crafting!
See you soon at the next Blog!