Wednesday, May 31, 2017

A Tag with Poinsettia!

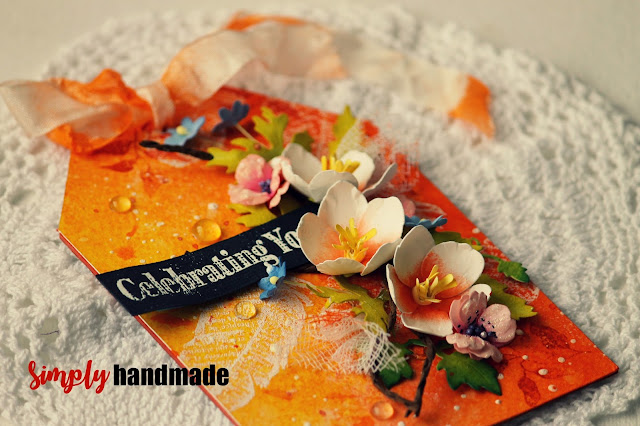
Hello friends, Piyanki here using the Poinsettia from Susan’s Garden to create a water color mixed media Tag!
Shaping poinsettias is what I love. I have made a Red and Pink Poinsettia earlier with a word background.
I used the new Distress Oxide for the background. Keeping a suttle background so that the flower pops.


How to:

  1. Cut a chipboard in the tag shape 6.5″ x 3″. Distress the sides and spunge with distress ink.
  2. Die cut 2 pieces of Entwined Circles.
  3. Die cut 2 sets of Poinsettia flower dies. Color and shade them with distress ink.
  4. Shape the flower petals and leaves using Susan’s Metal tool.
  5. Cut a piece of Water Color paper in the same size as the chipboard tag.
  6. Sprinkle with water to prepare the base and create the background with distress ink.
  7. First lay down the die cut circles pieces, add some mesh and prepare for the flower base.
  8. Arrange the flowers, leaves and then lay it on the mesh background.
  9. Sprinkle some white paint and stones to finish the background.
  10. Cut a Black strip of card Stock. Die the word Congratulations with a white paper.
  11. Adhere the sentiment at the bottom.


Love to hear from you!

Happy Crafting and see you soon!

Monday, May 29, 2017

Self Challenge 1 + Mudra

Welcome friends to another post where I am intending to start a very interesting series of post for myself and many others like me.

Week Back Erum made a reality check and here's where I picked up my challenge. She is an amazing crafter and you can view all her creations HERE.

So she knocked and said " Can we make some less bulky cards" and oh yes it was a real good knock and I thought its been time I made some single layered card. These are easy to mail and also quick to create.

Along with this I also challenged myself to pick any stamps from my stash and create some cards. 

Challenge Rules

1. Single Layered Card
2. Any 2 Stamps from Stash
3. Weekly Challenge

So for this week I have picked up 2 stamps from Mudra and created 3 cards.


3 cards from 2 stamps is what I have challenged myself.

Do share how you like it and also would love to hear from you.

Untill then happy Crafting!

Wednesday, May 24, 2017

Altered Art + Classic Petunia

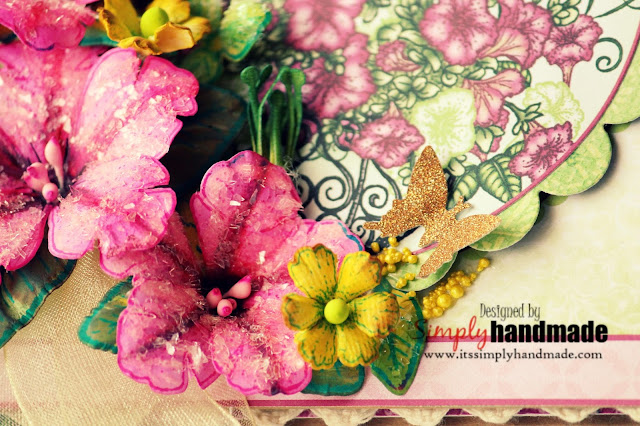
Hello friends. At heartfelt Creations we have debuted the Petunia this month and you have already witnessed an array of this beautiful flowers in many forms. 

Incase you still did not then head over to the Heartfelt Creations Blog Here. You will get to see loads of inspiration for yourself.

For today's project I have a altered Art for you all! I picked this iron bell from a Craft Exhibition and for long it was up on my wall till when I decide to alter it.


For the bell I created a Box also with the Petunia Paper Collection.


Instructions

Start by stamping multiple set of petunias from Small and large Classic Petunia using archival ink and pine needle for the leaves. Using the coordinating dies, die cut all the stamped images.Use the Stack and store daubers to shade the flowers using distress ink Dustic Concord. Finish the flowers by stacking each other and lay it flat and add prills at the center.

Stamp and die cut the petunia classic bouquet using archival ink.Water color the images using distress ink.Place the color petunia bouquet on the rim of the bell using hot glue.Place the shaped petunias, leaves ,stamen as desired in and around the bell structure to complete the composition.

To finish apply glossy accent to the bouquet and the flowers and sprinkle some frosty powders.

Heartfelt Products

HCD1-7141 Classic Petunia Bouquet Die
HCPC-3787 Classic Petunia CLing Stamp Set
HCD1-7139 - Small Classic Petunia Die
HCPC-3785 - Small Classic Petunia Cling Stamp Set
HCD1-Large Classic Petunia Die
HCPC-3786 Large Classic Petunia Cling Stamp Set
HCST1-401 Deluxe Flower Shaping Kit
HCPP3 - 452 - 1 - paper Pack of 25 - White
HCDA2-450 Stack and Store Daubers-Pack of 30
159723 Designer Dries Clear Adhesive
352854 Metal Tip for Adhesive Bottles
ANC845 - Power Outage Prills

Other Products

Iron Bell , Multi Medium Matt , heat gun, dimensional adhesive, Glue Gun, Glossy Accent, scissors, heat tool, Distress inks, Dustic Concord, Archival Black, Pine Needles.

Do share how you like my altered piece.
Will be back soon.
Until then lots of love and Happy Crafting!


...................................

Wednesday, May 17, 2017

Celebrate Canvas with the Petunia flowers

Welcome friend to my blog! With summer setting in , its time we appreciate and celebrate each season and its offering. Last week at Heartfelt Creations we launched the Classic Petunia and its bouquet.

Its the symbol of summer, the bloom is beautiful and also it multi hue.Today I bring you a water color mixed media Canvas.


Instructions

Start by taking a blank canvas and apply white heavy gesso.Use stencil and texture paste to create the first layer. Spray splashes of mojito green and iridescent orange on the canvas with water spray in between. Heat dry the base.

Stamp 2 set of petunias from Small and large Classic Petunia using archival ink and pine needle for the leaves. Using the coordinating dies, die cut all the stamped images.Use the Stack and store daubers to shade the flowers. Finish the flowers by stacking each other and lay it flat and add prills at the center.

Stamp and die cut the petunia classic bouquet using archival ink.COlor the images using water color and distress ink. Arrange the resin frame on one side of the canvas.Place the color petunia bouquet on one side of it using hot glue.Add prills, glitter, stamen as desired to complete the composition on the canvas panel.

For the sentiment heat emboss the sentiment on a black card stock and dry emboss using heat gun. Place the sentiment at last once composition is complete.

Product Used:

HCD1-7141 Classic Petunia Bouquet Die
HCPC-3787 Classic Petunia CLing Stamp Set
HCD1-7139 - Small Classic Petunia Die
HCPC-3785 - Small Classic Petunia Cling Stamp Set
HCD1-Large Classic Petunia Die
HCPC-3786 Large Classic Petunia Cling Stamp Set
HCST1-401 Deluxe Flower Shaping Kit
HCPP1 - 438 - 1 - paper Pack of 10 - Black
HCDA2-450 Stack and Store Daubers-Pack of 30
159723 Designer Dries Clear Adhesive
352854 Metal Tip for Adhesive Bottles
ANC845 - Power Outage Prills
ANC824- Stop Whinning Prills

Other Product Used

Canvas
 White Gesso 
Texture paste 
 Soft Matte Gel 
 Stencil 
 Heat gun
White embossing powder 
Resin Frame
Metal Charms 
 My Mojito Green 
 Iridescent Spray 
Twine 
Glue Gun
Glossy Accent
 Scissors
 Heat tool
 Barn Door
 Vintage Photo
Archival Black
 Pine Needles

Thanks for Stopping by!
See you soon at the next Blog!


Sunday, May 14, 2017

Happy Mother"s Day with Elizabeth Anemone Tag

This day needs no introduction neither any special mention. This day is no special occasion and still the most beautiful day. We all are here in this beautiful world for this amazing person " Ma".


Its the universal word, the universal relation and most important its the unconditional relation that can exist. I chose this day for this beautiful tag to gift my Mom. 

To "Celebrate Her", " Thank Her" , "Adore Her" , " Respect Her" , "Love Her"!

Flowers could be the best gift for any such beautiful moments.


I used "Anemone ", Cherry Blossom , Ivy Vine from Susan's Garden.

Its a mixed media , resist embossed , water color background and it was real fun creating the background.

Embellished it with filler Flowers, twine, mesh , pearls and bling!


Ma, this is for you!

Thank you for being there Always. You made world  a beautiful place for me!

Entering in:


Hope you like it!
Be back soon for some more creative fun!


Wednesday, May 10, 2017

Petunia Pocket Card - Debuting Classic Petunia Collection

Welcome back to another beautiful Wednesday and its the second of the month and here we are debuting the Classic Petunia Collection from Heartfelt Creations.

Summers already knocking the door quite early this year in India. Week back we have been lucky to get some splashes of rain but summers quite steady still. Lets welcome the warm sun with the Classic Petunia debuting today at the Heartfelt Creations.

They are bright and lively, colorful, bloom from spring until frost and scent the air with lovely fragrance. The collection holds beautiful stamps and coordinated dies to re create the nature in your own creative garden. The hanging pots, the garden chair, pots and the bouquet makes it extremely easy for all of us to experience the bloom.

On such a bright summer morning I welcome you to my Petunia Pocket card which is interactive and gives you the luxury to capture all your sentiments and memories for your special ones.


HCDP1-278 Classic Petunia Paper Collection
HCD1-7139 Small Classic Petunia Die
HCD1-7140 Large Classic Petunia Die
HCPC-3785 Small Classic Petunia Cling Stamp Set
HCPC-3786 Large Classic Petunia Cling Stamp Set
HCST1-401 Deluxe Flower Shaping Kit
HCFP1-435-3 Pocket and Flipfold Inserts C - Kraft
HCDA2-450 Stack and Store Daubers-Pack of 30
159723 Designer Dries Clear Adhesive
352854 Metal Tip for Adhesive Bottles
Bright Ideas Prills - 12 Pack

Other Products: Scalloped circle die, Ribbon, lace, Pearl Bling, floral stamens, beads, dimensional adhesive, Glue Gun, Kraft Card Stock, Glitter, Glossy Accent, Diamond Dust, Paper trimmer, scissors, score board, heat tool, Distress inks, Barn Door, Vintage Photo, Archival Black, Pine Needles

Instructions: Start by taking the Flipfold C insert. Cut coordinating size paper from the petunia paper collection and attach. Diecut scalloped circle from card front and use dimensional adhesive to attach onto card.

Stamp the multiple set of petunias from Small and large Classic Petunia using archival ink and pine needle for the leaves. Using the coordinating dies, die cut all the stamped images. Diecut stamens. Use the Stack and store daubers to shade the flowers. Use the Deluxe Flower Shaping Kit Shape the flowers and leaves. Finish the flowers with prills and glitter dust.

Cut some Tag from kraft card stock and use them as inserts. Finish off the tags with ribbons. Arrange the shaped petunias, leaves and stamen and attach them to the front panel. Add prills, glitter, stamen as desired to complete the composition on the front panel.

Until then happy crafting!
See you soon at the next blog!


Saturday, May 6, 2017

Gerbera Money Wraps + Elizabeth Craft Designs

Welcome friends to another post where I use the Gerbera Flowers to create Money Wraps. As always making these flowers have always been fun and exciting. 

Creating these Money Envelopes has a little story to it, One of my fellow crafter Hussena has been creating these beautiful money wraps and I was inspired by her to create my own version.

I intent to create many more versions of this same and share the tutorial with you all.


Instruction

Take a 7 1/4" x 71/4" Card stock.
Score at 1 1/4" and 4 1/4" and fold it.
Take a 1" long strip to create the Belly Band
I have shaped the Gerbera using Fabriano Paper. Did not use any Distress ink, no coloring.
( Yes you can make flowers without coloring with any ink)
Created a water color background, splashed some Lindy's spray.
Die cut a piece of the filigree and arrange the flower arrangements.


Product Used

Vellum Sheet

Thats all for today. Do share how you like it and share some love and comments.
Untill then Happy Crafting!

Wednesday, May 3, 2017

Sunrise Lily Gift Set

Hello friends, Another beautiful Wednesday  and I am here with my first design project for Heartfelt Creations. Once again thanks to all my blog readers who continue to give me strengths, appreciation and love for my work.


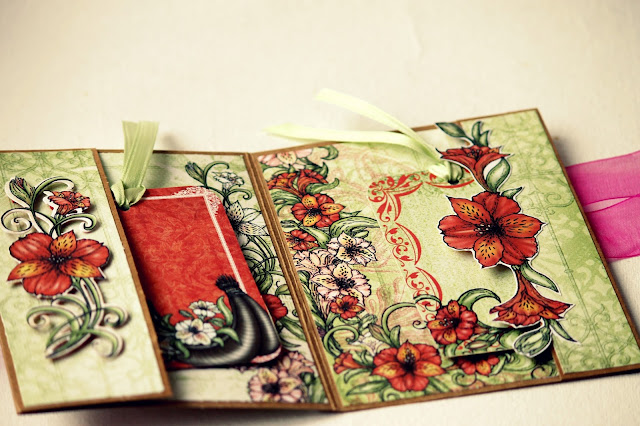
Welcome today where I am sharing a Gift set ( Gift Bag + Gift Card Holder) using the Sunrise Lily Collection. We all love gifts and what if the gift bag is a special one too. 

Its a altered Kraft gift Bag along with a designer Gift Card Holder.


A closer look at the flowers.


Instructions

Gift Card Holder:
Start by taking the Flipfold C insert and adhere the 2 opposite side to create the pocket
for the card. Cut cordinating papers from the Sunrise Lily Collection(3.5"x5.4") for the
2 pockets inside.Die cut Sunrise Lily Swirls and bouquet from the paper and adhere to the
inside and on the cover.I used a pink organza ribbon and adhered it before layering the
cordinating papers on the front and back.

Gift Bag:
The gift bag measures 5.5 x 4.2 ".
Cut 5.5x4.1 paper from the paper collection for the front and back of the bag.
For the flowers I stamped several pieces of the Sunrise lily using Hero arts
orange dye ink.Colored them using Barn Door Distress ink. Die cut all the flowers
using the cordinating die and then shape them with the embossing tool.For the leaves
I have used pine needled distress ink and shaped them accordingly.Arranged all the
flowers and leaves on the front cover of the bags. I used hot glue to adhere all the
flowers and leaves.Also removed the original handle of the bag and tied a coordinating

pink organza ribbon to go perfectly with the card holder.


HC Supplies

Sunrise Lily stamp, HCPC-3720
Sunrise Lily die, HCD1-787
Sunrise Lily Swirls Die, HCD1-788
Sunrise Lily Paper Collection, HCDP1-263
Pockets and Flipfold Inserts C-K, HCFP1-435-3
Paper flowering Dogwood paper collection, HCDP1-275
Designers dries clear adhesive, 159723
Metal tip for adhesive bottles, 352854
Memento Dye ink pad- Bamboo leaves, TSMP-707

Stack & store daubers pack of 6, HCDA1-449

Other products:
Ribbon,lace,Pearl Bling,beads,Glue Gun
Kraft Gift Bag,Glitter,Glossy Accent,Diamond Dust
Paper trimmer,scissor,score board,heat tool,distress inks
Barn Door,Vintage Photo,Archival Black,Pine Needled

Please hop onto our Wednesday Inspiration where you enter a world of creation by all the designers HERE. We love to see what you design and do share with us.

See you soon at the next blog soon!
Love XXX!