Wednesday, December 27, 2017

Think Happy , Be Happy!

Hello friends, Welcome once again here with a watercolor tag and some Dahlias for you all. Flowers have been the most inspiring element in all of my projects and I continue to enjoy making them with Susan’s Garden dies. Let’s have a look at how to create this tag.


  1. Die cut watercolor paper using the Tags & More die in whatever length you choose.
  2. Softly tint the bottom section of the tag with Crushed Olive Distress Ink. Also ink the edges of the tag.
  3. Mist lightly with water and add more color with watercolor sprays.
  4. Heat set between steps.
  5. DIe cut pieces for Garden Notes Dahlias 2 from White Soft Finish Cardstock.
  6. Shade and color with Squeezed Lemonade Distress Ink and Sunflower Archival Ink.
  7. Die cut Dahlia leaves from green cardstock and fern from white. Add color to the fern and to the edges of the leaves with Crushed Olive Distress Ink.
  8. Stamp sentiment toward the top right of the tag.
  9. Shape leaves and petals. Assemble the bouquet and adhere to the tag as shown in the photos.
  10. Add a ribbon at the top of the tag.
Thats all from my side today, let me know how you like it. Will be back soon with some more creativity.

Until then happy crafting!

Fold out Foam Carnations

Good Morning Friends, With a Merry Christmas just gone by, I am back with another Heartfelt Creations today! In today's card I have used the fold out cards and some newly launched foam flower. The fold out cards are so much fun to work with,

For today's card here's how I have created with some foam carnations and fold out technique.


Instructions

Start by taking a Kraft flip fold card layout. Measure patterned paper at 1/8" less than the card and distress the edges. There are 2 layers in each of the fold which measure 1/8" less. Stamp some small and large carnation using Plum and leaf archival ink from white foam paper. Shade and color the petal using Crushed Olive and Wilted Violet distress ink. The edges are re-inked once the petals and leaves are shaped.
Die cut a decorative border from white card stock and tuck it in every layer between the card base and the pattern paper. To shape the foam flowers, I used a press which allows the petals to bend automatically and then we can shape it. Layer the petals, pierce the centers and add the stamens.
To arrange the bouquet, use some twigs, pearls and leaves and assemble all the shaped flowers and leaves. Adhere as shown. To finish the card fussy cut tags and sentiments from the paper collection and distress the edges with frosted powder.
For more tips on creating with the Camelia Carnation collection, watch the tutorial at https://youtu.be/rhk76SAIgWQ.
For more tips on creating with the foam paper & stamens, watch the tutorial at https://youtu.be/Oma6ctVmUD0.
Supplies


Thursday, December 21, 2017

Mudra with some Stencils and Dies

Hello Friends, I am having some fun cards with newly launched dies and stencils at Mudra Blog today.

I have some glimpse here for you all.


For the full reveal and how I have made t his card visit here.

Until then , have fun and see you soon as the next blog.


Wednesday, December 13, 2017

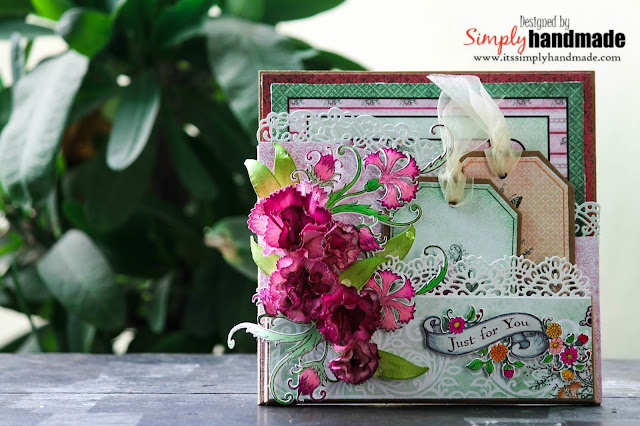
Debuting Carnations with a Interactive Pocket Card

Hello friends, heartfelt Creations invites you all to celebrate the beauty and gentle humbleness of the carnation with the Camelia Carnation Collection. With a color palette of fiery reds, pastel pinks, sunset orange tones and lush hues if greens, the amazing paper collections brings with a bold but feminine feel.

I loved this collection thoroughly and so would you for sure. I have a interactive card for you with some pockets to hold your tags and letters. The fold is interesting and fun.


Instructions

The final card measures 5.8” x 5.8” and the base is Kraft. Take a Kraft color CS and score it at 5.8” square card. Take a pocket insert from the Flipfold insert A and a decorative shape and adhere it to the front panel of the card. This forms the opening of the card with a pocket in the front. Cut pattern paper from the collection at 1/8” less for all the base CS and adhere it. For the edges of the pocket and front panel, die cut pieces from the Sweet Border set and fleur die set it adhere to the pocket and the front edge. For the pocket, fill in some tags fussy cut from the paper collection. This will complete the card base with decorative border.
Stamp and die cut several pieces of the Carnations from white card stock using plum Archival Ink. Later using a sponge and picked raspberry distress ink color the petals. For the leaves stamp and die cut using the stamp set and coordinating die, crushed olive inks.
For the Fanciful carnation stamp using plum archival ink on a Neenah white CS and then color using zig markers. Once all colored and shaped assemble the flowers, leaves tucked in with the fanciful carnation.

Products

HCD1-7164 Small Carnation Die 
HCD1-7129 Large Carnation  Die
HCD1- 7166 Fanciful Carnation Die
HCPC-3806  Small Camelia Carnation Cling Stamp Set
HCPC-3752, Large Camelia Carnation Cling Stamp Set
HCPC-3808, Fanciful Carnation Cling Stamp Set
HCDP1-270, Camelia Carnation Paper Collection
HCPC – 3804 Heartfelt Love Sentiments Stamp Set
HCD1 – 7160 Banners of Love Die
HCD1 – 7161 Sweetheart Border Die
HCPC – 3803 Banners of Love Stamp Set
HCD1-7120 Fleur Border Basics Die
HCFP3 – 493 – 3 Pocket and Flipfold Inserts A Kraft
159723, Designer Dries clear Adhesive
352854, Glue Tips - Metal
PGM15015, Rajni Chawla’s Crystal Clear Glitter
HCPP1- 438 - 3, Paper Pack of 10   - Kraft
HCDA1-450Stack and Store Daubers- Pack of 6

Until then happy crafting and I will be back soon!


Tuesday, December 12, 2017

Christmas with Poinsettia + Susan's Garden

Hello Friends, welcome back to another challenge for Susan's Garden at Elizabeth Craft Designs. Yes and its Christmas so we are going with the traditional color of Christmas.

For my card today I have used white gold and some poinsettia. kept it simple with some frills.

Please visit the ECD blog here to view more inspirations. Here;s what we want to ask all of you

What Susan Garden products would you like to find under your Christmas tree this year?”


The poinsettias are foam flowers and shaped by heating the petals. Its a tone on tone on white with splashes of gold and green. The Gold border holds the frame on a scored background.

Do share how you like it and I will be back with some more inspirations and new projects.


Monday, December 11, 2017

Cards With Mudra New Paper Pad

Hello friends, welcome here today sharing some cards created with the newly launched paper collection from Mudra. The paper pad is cute , fun and has a element sheet which will allow you make some quick cards in less than 10 minutes.


My blog is acting funny for some days now hence unable to publish the blogs.

Card 1

The first card is a birthday card featuring one of the cute element from the element sheet.To make this again its quite a easy one.

- Cut and score a white card stock to measure at 5.5" x 4.25 to form the card base.
- Cut a pattern paper at 1/8' less than the card base.
- Die cut a another co coordinating pattern paper from the collection at 2"less than the first layer.
- Fussy cut any of your favourite image from the element sheet( For this one I chose the birthday bear).
- End the card by stamping a Happy Birthday sentiment.


Card 2

- Cut and score a white card stock to measure at 5.5" x 4.25 to form the card base. This will be a vertical alignment than the previous one.
- Cut a pattern paper at 1/8' less than the card base.
- Die cut a another co coordinating pattern paper from the collection at 2"less than the first layer to form the frame.
- Stamp the cute giraffe using black archival and then color it using Zig brushes.
- Fussy cut the image and adhere it at the center backing with foam dot.
- End the card by stamping a Hello sentiment.


Card 3

- Cut and score a white card stock to measure at 5.5" x 4.25 to form the card base.
- Cut a pattern paper at 1/8' less than the card base.
- Cut a another pattern paper at 2.5"x 5.4" and adhere it on the first layer.
- Fussy cut any of your favourite image from the element sheet
- Adhere the image on the panel with a foam adhesive dot.
- End the card by stamping a sentiment.


Do share how you like it and I will be back soon with some more inspirations and project.

Until then Happy Crafting!

Monday, October 30, 2017

Cards with Mudra

Good Morning Friends, I am at Mudra today with some simple fun , regular techniques. Fussy cutting has been fun with these cards and stamps.

Here's a glimpse.


For Instructions, more pictures visit the Mudra Blog below:

http://mudracraftstamps.blogspot.in/2017/10/thanks-paw-mise-cards.html

While you hop around with some fun techniques, see you soon.

Lots of Love
Happy Crafting.

Thursday, October 26, 2017

Congratulations Card – Love in a Mist

Hello Friends, Piyanki here with  a new project using some brand new Susan’s Garden dies. The collection is fun , creative and as always immensely intricate to give your flowers the perfect shape and natural look. For today’s post I have chosen the Garden Notes –  “Love in a Mist” (Nigella Damascena) die set. First the name fascinated me and then when I researched a little about the flower, it blooms in the color blue. For a long time I have not created any flower in blue so went for it at once.
Love in a Mist is a common name for “Nigella”. The ferny , fennel like foliage makes it look all the more interesting. With the die set you have the perfect dies for the foliage which will add the natural look once you assemble the flowers. I chose to create my flowers blue for my card, however you can find these flowers in a variety of different colors.


Step 1 : Cut a piece of White Soft Finish Cardstock to 8.5″ x 5.5″, score along the long side at 4.25″ to create a  4.25″ x 5.5″ top folding card which will be the base of the card.
Step 2 : Cut another piece of White Soft Finish Cardstock at 4″ x 5.3″ to form the second layer. Use the Stitched Oval die to die cut a section of the card stock.
Step 3 : Cut a piece of Watercolor Paper to 3″ x 5.3″ add color to this panel using  Distress Oxide of your choice.( Iced Pruce , Broken China used on this card) and some Distress Ink ( Squeezed Lemonade , Curved Pumpkin).
Step 4: Keep adding layers of distress ink, splash some water and then heat dry it in between every layer. Once you form the desired shade adhere this layer to the second layer.
Step 5:  To add more depth to the card base die cut several pieces of the smallest dies from Garden Notes Dahlia 2 and adhered it all over the card stock.
Step 6: Using the Love in a Mist die set, die cut enough petals and leaves to create three flowers from White Soft Finish Cardstock.  Color using Zig Markers.
Step 7 : Assemble all the flowers , ferns around the upper portion of the stitched oval.
Step 8: To finish the card add a die cut the sentiment “Congratulations”  3-4 times from a White Soft Finish Cardstock, stack the sentiments together to give a raised effect. Adhere to the lower portion of the oval opening.

Come Fly With Me Layers

Hello Friends, though this post goes late however this is when we are debuting a brand new collection at Heartfelt Collection.

This collection makes you feel young again , some fun coloring , cool cars and lush green pastures. This collection also gives you some free chocolates and definitely the window seat :).


Instructions

For images of the inside pages see here. The final layered card measures 6” x 6”. Cut designer paper for each side of the page, die cutting the center using the circle die. For each pages I have layered 2 circle borders with coordinating paper. Once all paper are adhered to the base pages, start decorating each page.
Stamp, die cut and color some sunflower accents, filler leaves, dogwood flowers, petunia flowers. I stamped everything in Archival Black ink except the dogwood flowers(Plum & Sunflower Archival), the Leaf from the Simply Classic set (Leaf-Archival ink) and the leaves from the Sunflower Accents set (Plum Archival on patterned paper and edged with Carved Pumpkin Archival ink). Die cut decorative borders, and fussy cut the tags and cards from the tag sheet. Shape the flowers using the deluxe flower shaping kit. Each page is designed and embellished in different style keeping the collection theme in place.
For the last page a small envelope is created to hold all the tags and journaling. Each page is given a base border using the border dies. For the front of the album, 2 circle die cuts are adheres on a foam adhesive and placed on one corner with leaves, tiny flowers tucked in. On the other corner a bunch is created using the sunflower accents and filler flowers.
Arrange as desired, I added Crystal Clear to the flowers with prills in the center.

Product Used

Tuesday, October 17, 2017

Diwali Cards with Mudra

Welcome friends to another post where I am having some fun creating with Mudra brand new Diwali release stamps.

Loads of stamping , coloring , fussy cutting and then layering.All this is possible with the Mudra Stamps.

I have made 6 cards using various stamps set , mixing sets , use of the smallest stamp to create some borders and focal areas.

Below is a sneak peak of all the projects created.


Until then , see you having some fun creating with Mudra Stamps.


Tuesday, October 10, 2017

Be the Sunshine

Hello Friends, after a technical pause back to my blog! There is some technical error going on due to which I am unable to operate. However with some workaround I am able to be back.

Today I am with a project featuring some garden fairies from Susan's garden collection. The flowers and the fairies completes your perfect garden.

First lets see some of the projects glimpse and then to the ECD challenge post.


If you want to see more inspiration here's LINK.

For today's challenge Elizabeth Craft Designs are giving away a $20 Gift Card to use on the Elizabeth Craft Designs website to 3 winners. 

To enter simply leave a comment on the Elizabeth Craft Designs Challenge post and tell us If you had your own fairy, what would be 3 products on your crafting wishlist?

We will select 3 lucky winners in a random drawing 

The winners will be announced on Friday, October 13th, on the Elizabeth Craft Designs blog.


Product Used


Hope to see you soon! Love to hear from you. Share your love , comments and thoughts.


Wednesday, September 13, 2017

Sunflower Canvas

Hello friends, how are you all doing! Today is the day we are debuting a brand new collection at Heartfelt Creations.Long days filled with sun rays begin to fade and the crisp evening breezes begin to call for some cozy wool knit sweaters as the fall season slowly ushers out the lazy days of summer.

I have a water color background canvas welcoming the autumn days and also the bright sunny sunflower.


Instructions

 Its a mixed media canvas measuring 8" x 6". Layer a thin coat of white gesso on the canvas. Using texture paste and stencil create the first layer and heat dry it. Sprinkle water and then random sprays of water color, sprays and shimmer color. In between every layer, heat dry the canvas. 
Stamp and die cut several pieces from the HCD1-7153 Sunflower Accents Die and stamp set in Archival Black ink onto white cardstock and diecut with coordinating die. Color each of the accents using any medium (here I have used water color using distress inks).
Also stamp and die cut several pieces using the HCD1-7153 Sunflower Accents Die from Beary Fun Retreat Paper Collection using Archival Black ink on white cardstock. This will form the foliage and filler leaves. Color with distress inks Vintage Photo, Pine Needles, Twisted Citron, Barn Door. Shape using the Deluxe Flower Shaping kit.
For the center die cut several pieces of the Sun Kissed Fleur using  white cardstock and then color and shape the petals and leaves using the Deluxe Flower Shaping kit. Complete the flower with some center prills. 
To assemble all on the canvas, use soft gel to place all the leaves, sunflower accents and then some twines. To finish the canvas layer the large sunflowers. Embellish with some art stones and prills. Use a sentiment from the paper collection and tuck it on the canvas.
Other Products: Heat gun, foam, scissors, scoreboard, trimmer, water color brushes, Archival Ink (Sunflower and Black), Distress Ink (Vintage Photo, Pine Needles, Twisted Citron, Barn Door), Tim Holtz Stencils, Water & Shimmer Spray (Orange-Itsy Bitsy, Mocha-Kaiser Craft, Lemon-Itsy Bitsy), Ranger Texture Paste, Ranger Soft 3D gel, Ranger Multi Medium, white gesso, art stones

Do share your views , comments and love. Would love to see your creation.
Untill then Happy Crafting and will be back soon.


Tuesday, September 12, 2017

Be the Sunshine

Hello friends, welcoming you to my post. I appreciate you stopping by. Today I have a brand new card using Susan's Anemone flowers. I have made many projects with this flower and somehow I dont get enough.
Its a beautiful flower and love love working on it. Now for any of my card/projects I love to create a background/backdrop on which I lay or assemble my bouquet of flowers.
Every time I try and create something new whether its tone-on-tone , watercolor , mixed media , texture background or something new.
This time I used some scraps of solid card stock to create the backdrop. I had seen a video long back from Jennifer and always wanted to try this technique.
This month I am hooked to this background and I am in the spree to make more and more of this background.


Instructions

1. Cut and score a white card base to 5.5" x 4.25"
2.Cut several thin strips from coordinating color card stock.
3. Die cut, color and shape several Anemone along with the leaves.
4. Fill the centers and keep it ready to assemble.
5. Adhere all the strips onto the card base.
6.Snip off the extra ends from both sides of the card.
7. Assemble the flowers and leaves.
8. Finish the card with a quote from the stamp set.

Product Used

Susan's Garden - Anemone
Soft White Card Stock
Soft Card Stock - Set 3
Metal Tool Set
Kids Choice Glue
GN Ivy Vines
Molding Mat

Do share how you like my project. See you soon at the next blog!

For our Challenge today Elizabeth Craft Designs are giving away a $20 Gift Card to use on the Elizabeth Craft Designs website to 3 winners.


To enter, simply leave a comment on the Elizabeth Craft Designs blog post and answer this question: What Home Decor items do you like to create to use in your home?

We will select 3 lucky winners in a random drawing.

The winners will be announced on Friday, September 15th, on the Elizabeth Craft Designs blog.